

3.8 Connectivity
Configuration
Connectivity
Ethernet
To change the parameters of the connection to the Ethernet network, select the menu "Connectivity → Ethernet":
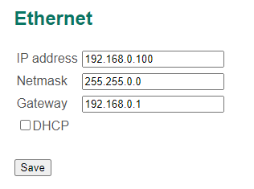
In this section:
- IP address – static IP address of the board;
- Netmask – static netmask of the board;
- Gateway – default gateway;
- DHCP – a flag to enable IP address determination via DHCP protocol.
CAN
To change the connection parameters to the CAN bus, select the menu "Connectivity → CAN":
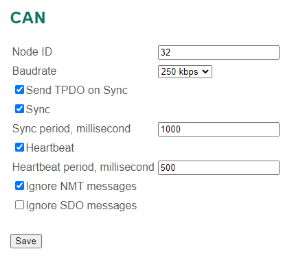
In this section:
- Node ID – a board identifier in the CANopen network;
- Baudrate – CAN bus speed;
- Send TPDO on Sync – a flag to enable sending TPDO messages on each synchronization message;
- Sync – a flag to enable sending synchronization messages (CANID = 0x80, data length 0 bytes);
- Sync period – synchronization messages sending period, millisecond;
- Heartbeat – a flag to enable sending Heartbeat messages;
- Heartbeat period – Heartbeat sending period, millisecond;
- Ignore NMT messages – a flag to ignore CANopen command messages;
- Ignore SDO messages – a flag to ignore CANopen SDO messages.
Modbus
The board supports Modbus RTU and Modbus TCP protocols.
To change the connection parameters to the RS-485 bus, select the menu "Connectivity → Modbus":
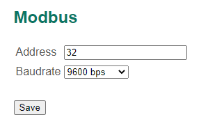
In this section:
- Address – a network address of the board;
- Baudrate – RS-485 bitrate.
To work with the board using the Modbus TCP protocol, use the standard port 502.
Wi-Fi
Using BMS Wi-Fi, BMS Main 2.x supports connection to a Wi-Fi network.
To change the settings for connecting to a Wi-Fi network, select the menu "Connectivity → Wi-Fi":
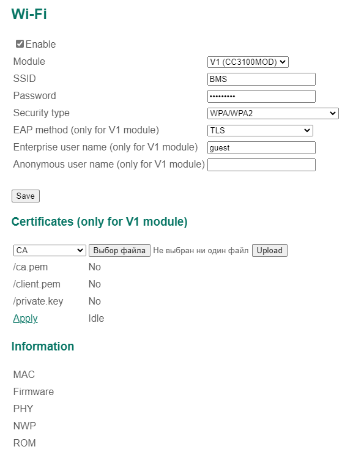
In this section:
- Enable – a flag to enable Wi-Fi;
- Module – version of BMS Wi-Fi module:
- V1 (CC3100MOD);
- V2 (ESP32-C3);
- SSID – a name of a Wi-Fi network;
- Password – password to connect to a Wi-Fi network;
- Security type – type of secure connection:
- Open;
- WEP;
- WPA/WPA2;
- EAP.
- EAP method (only for V1 module) – EAP authorization method. Security certificates need to be uploaded to BMS Main;
- Enterprise user name (only for V1 module) – EAP connection user name;
- Anonymous user name (only for V1 module) – EAP connection anonymous name;
«Certificates (only for V1 module)» section:
- Upload – button to upload certificate to SD card. To the left from “Browse” button typer of certificate must be set:
- CA – certificate authority public key;
- Client certificate – client public key;
- Client key – client private key;
- /ca.pem, /client.pem/, /private.key – status of uploaded certificates;
- Apply – a link that will apply configuration changes.
To set up the EAP connection do the following steps.
- Go to the section “Connectivity – Wi-Fi”
- Upload the CA, client certificates and the client private key in the subsection “Certificates”:
- Select “CA”, chose the CA certificate file, click the “Upload”
- Select “Client certificate”, chose the client certificate file, click the “Upload”
- Select “Client key”, chose the client private key file, click the “Upload”
- Click the “Apply” and all uploaded file will be flashed to the Wi-Fi module
- Select the security type “WPA2 EAP”
- Select the “EAP method”.
- Type the password if needed.
- Type the user name (don’t leave it blank) and the anonymous user name.
- Click the “Save”.
- Reboot the BMS.
FTP synchronization
The board supports the periodic sending of log files stored on the SD card to a remote FTP server over a Wi-Fi network. The BMS has two schemes of sending log files: sending files collected yesterday and today; sending all log files.
The algorithm for sending files collected yesterday and today:
- If the time T ≥ Tsend has elapsed since the last success transmission, the transition to step 2, otherwise exit.
- Connect to a remote FTP server.
- If the log file for the current (previous) day with the number NUMBER was not sent, then go to step 4, otherwise exit.
- Create a file named "SNXXXXX_LOGYYYYMMDDCC.TXT" on the server, where XXXXX is the serial number of the board; YYYY, MM, DD – respectively, the year, month and day of the current (previous) day; CC = NUMBER - the number of the log file.
- Copy to the created data file from the log file named "SNXXXXX_LOGYYYYMMDDCC.TXT" with the parameters of the battery and BMS for the current (previous) day.
- Closing the file. Increment of the number of the log file (NUMBER = NUMBER + 1).
- Closing a connection to a remote FTP server.
The algorithm for sending all log files differs from the algorithm for sending files collected yesterday and today in that the history of the sent files is kept.
The history is represented as a text file on the SD card: for the common log files, the file with the sending history is named “LOGSENT.TXT”, for the log files with cell parameters data – “CELLSENT.TXT”.
After sending the next log file to the file with history, a new record with the date and number of the sent log file is added. During the next communication session, the system will try to send a log file that follows the previous one – this is a log file with either a large number (NUMBER) or a late date and NUMBER=1.
To change the settings for sending log files to a remote FTP server, you must select the menu "Connectivity → FTP synchronization":
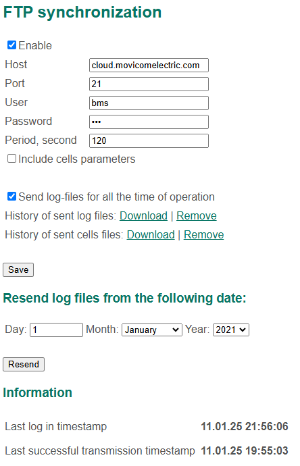
In this section:
- Enable – a flag to enable sending log files;
- Host – a name of the remote host on which the FTP server is running;
- Port – a port number of the FTP server;
- User – user name;
- Password – user password;
- Period – period Tsend sending log files to the FTP server, second;
- Include cells parameters – a flag to send also all cells parameters to the FTP server;
- Send log-files for all the time of operation – a flag to send to the FTP server all log files accumulated during the operation of the BMS;
- History of the sent log files – operations on the file with the history of sending the common log files: download and remove (if the file is removed, the log files will be sent from the current date to the FTP server);
- History of the sent cell parameters files – operations on the file with the history of sending log files with cell parameters: download and remove (if the file is removed, the log files will be sent to the FTP server starting from the current date);
- Resend log files from the following date – a field to resend files from selected date. To do it select the date and click "Resend";
- Last log in timestamp – a time of the last connection to the FTP server;
- Last successful transmission timestamp – a time of the last successful transfer of the log file to the FTP server.