5. Обновление ВПО
Firmware update
Введение
Настоящий документ описывает порядок обновления основной микропрограммы устройства BMS Main X.
Обновление основной микропрограммы BMS Main X может быть выполнено следующими способами:
- через загрузчик (возможно только по USB);
- через конфигурационный интерфейс устройства (возможно по USB, CAN и TCP).
Требуемые аппаратные и программные средства:
- Программа ElectricDeviceMonitor для ОС Windows, с помощью которой выполняется настройка и обслуживание устройств BMS Main 3 / BMS Main 3X;
- Интерфейс связи:
- Адаптер USB/CAN — для обновления по шине CAN;
- Кабель USB-mini — для обновления по USB;
- BMS Wi-Fi или BMS LANmodule, установленные на плате BMS Main 3 — для обновления по TCP;
- SD карта — для обновления через конфигурационный интерфейс;
- Файл с основной микропрограммой (должен иметь формат "Motorola S-record .srec").
Updating via bootloader
Firmware updating includes two steps:
- starting the bootloader;
- uploading the firmware file to the BMS Main X flash memory.
1. Start the device bootloader.
- Method 1: using the Unified monitor of the ElectricDeviceMonitor program, connect to the BMS Main X device via the USB, CAN or TCP connection. Next, in the monitor program, click the "Device → Go to bootloader" menu item:

- Method 2: hold the SW1 button on the device for 1 second. After the indication LEDs go out, release the button. A restart will be performed, and the device will enter bootloader mode.
2. Upload the firmware.
2.1 Launch the ElectricDeviceMonitor’s Updater module:


2.2 From the drop-down menu of the Updater window, select the method of connecting to the BMS Main X device and configure the connection parameters (the "Settings..." button).
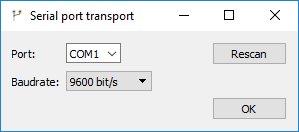
- USB connection: select the connection method “Serial port transport”, click the “Settings...” button. In the window that appears, select the COM port through which the PC connects to the device (the baud rate can be set to any):
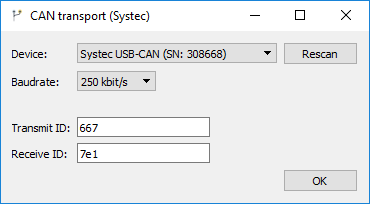
- CAN connection: select the "CAN transport" connection method, click the "Settings..." button. In the window that appears, select the USB-CAN adapter with which the main firmware will be loaded, and specify the baud rate via the CAN bus:
- RS-485 connection: select the connection method “Serial port transport”, click the “Settings...” button. In the window that appears, select the COM port through which the PC connects to the device, and specify the baud rate (set up in BMS settings):

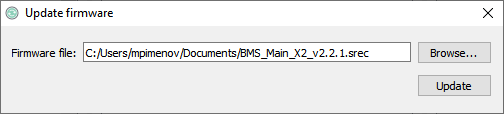
2.3 Click the "Browse..." button and select the *.srec file with the main firmware.
2.4 Click the “Update” button while the device is in bootloader mode. The process of loading the new firmware into the device memory will begin.
Update via configuration interface
1. Perform connection to the device and user authentication in the Unified monitor.
2. Select the “Device → Update firmware…” menu item. In the appeared window, click the “Browse…” button and specify the path to the file with the new main firmware (*.srec).

3. Click the "Update" button. The file will begin transferring to the device. Once the transfer is complete, the device will reboot, and the main firmware update will begin. The update takes approximately 2 minutes.